Most outdoor lighting fails not because the fixtures are wrong, but because the controls don’t match how people actually use the property. You get lights that run all night when no one’s outside, bright blasts that blind the doorbell camera, or a path lit like a runway when a soft “welcome pool” would feel better. The key to beautiful outdoor lighting is simple: choose a control package that mirrors real life—hands-off when you want it, responsive when you need it, and quiet the rest of the time.
It's time to turn all that control jargon into purposeful, everyday choices. We’ll compare integrated photocells (hands-off dusk-to-dawn), PIR motion (responds when someone arrives), timers and astronomic clocks (predictable schedules without reprogramming), and app-based options (where supported). You’ll see how to layer a low baseline with a motion “lift,” how controls affect solar runtime (autonomy and duty cycle), how to avoid camera washout and neighbor glare, and when it’s time to loop in a home-automation pro.
Hands-Off or On-Cue? When to Choose Photocell, PIR Motion, Timers, or Smart
A good control choice starts with one question: Do you want your outdoor lights to think for you, or react to you? Most properties benefit from both—set-and-forget coverage where it helps, and responsive brightness where it matters.
Integrated Photocell (Set It and Forget It)
A built-in photocell turns a light on at dusk and off at dawn using the sky’s brightness. There’s no app, no programming, and no clock to adjust after power blips. For many zones, this is the default you’ll rely on every day. Use photocell control when you want:
- Reliable wayfinding: Front walk, house numbers, step edges, dock edge markers.
- A welcoming baseline: A gentle 20–40% brightness that says, “You’re home,” even if no one is outside.
- Zero maintenance: No seasonal tweaks, no fiddling with schedules.
On path markers and wall lights, photocell modes give “always ready” guidance with solar-sensible output. Pick warm CCT and shielded optics to keep it comfortable.
Watch for: If a photocell is placed under a bright porch light, it can false-read and shut off early. Keep the sensor where it sees the open sky, not your lamp.
PIR Motion (Light When People Show Up)
PIR (passive infrared) motion detects warm bodies crossing the sensor and bumps the light up for a short window (often 10–60 seconds). This is ideal anywhere you arrive with your hands full, move quickly, or want to save battery until someone’s present. Use PIR when you want:
- Confidence on approach: Side gates, garage entries, trash path, dock approach.
- Battery stretching: Run low the rest of the night; reserve a bright lift for actual use.
- Polite security: Motion signals activity without blasting the neighborhood all night.
Placement matters here. Aim PIR sensors to catch crossing motion, not straight-at movement. Offsetting the fixture 30–45°from the path increases detection range and reduces nuisance triggers from the street. Many SunTino fixtures offer “Low + Motion Boost”: a steady, low glow that jumps to full only when needed. It’s the simplest way to avoid the runway look.
Schedulable Timers and Astronomic Clocks
A timer turns lights on/off at set hours; an astronomic clock uses your location to follow sunset/sunrise automatically (so you never update for seasons). Both keep lighting predictable, which is helpful for curb appeal, pet routines, and quiet hours. We recommend using timers/astronomic clocks when you want:
- Curfews: On at dusk, off at midnight, then motion-only until dawn.
- Quiet zones: Patios that go dark after company leaves, drives that don’t need full night coverage.
- No app dependence: Set once and forget for the year.
Generally, if your fixture offers selectable schedules, pick dusk-to-midnight for social zones, dusk-to-dawn low for safety markers, and motion-only after midnight to save solar charge.
App-Based / Smart Add-Ons (Where Supported)
Some fixtures or inline accessories (rated for outdoor use) allow Bluetooth or app control for brightness steps, timer windows, or temporary scenes. Keep expectations practical: you’re not building a home-theater sequence; you’re adjusting a few behaviors without climbing a ladder. Smart add-ons are ideal when you want:
- Fine-tuning without tools: Bump baseline from 20% to 30%, extend boost from 15 to 30 seconds.
- Temporary modes: For a party or late return.
- Group control: Of a few nearby fixtures.
Solar fixtures run on DC, and not all smart switches are designed for that. Only use accessories explicitly rated for your fixture type and environment. If you’re tying lights into a broader home system (Control4/Lutron/Crestron), an integrator handles the bridge; SunTino sells the fixtures.
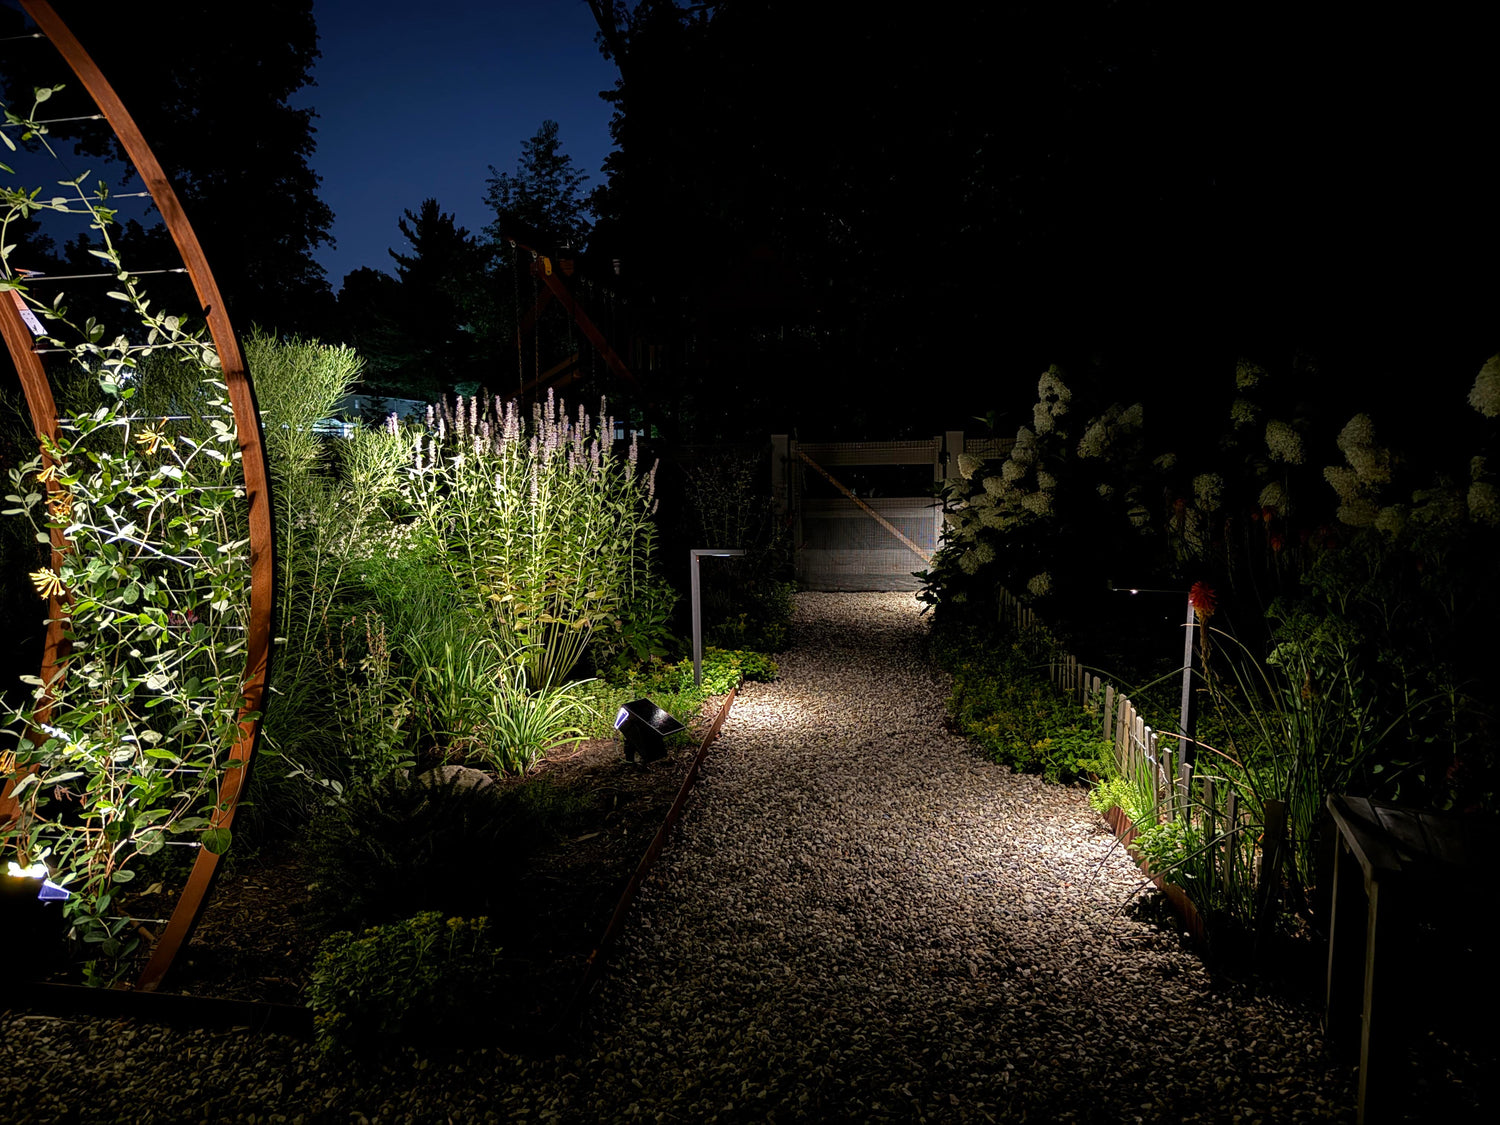
Layering: Low Baseline + Motion “Lift” (Goodbye, Runway Effect)
A yard that looks great at night usually has a little light everywhere and more light where people are. That’s layering in one sentence. The simplest recipe: a low, steady baseline for orientation, plus a motion lift that follows you through the space.
Why Layering Works
When light levels change gradually instead of all at once, the space feels natural, you use less energy, and the nighttime view stays calm from the street.
- Comfort: Your eyes adjust easily because there’s no jump from black to blinding.
- Battery sense (solar): Low baseline protects runtime; short, targeted boosts do the heavy lifting only when needed.
- Politeness: You get brightness on approach while neighbors see a calm scene.
A Simple Layer for Common Zones
Here’s how that idea looks in real life—same pattern, slightly different settings depending on where you are on the property:
Front walk:
- Baseline: Path markers at 20–40% from dusk to midnight.
- Lift: PIR bumps markers to 100% for 15–30 sec when someone arrives.
- After midnight: Baseline off; motion-only.
Side gate / trash path:
- Baseline: Off (no one’s there most of the night).
- Lift: Wall or path light motion-only to full for 30–60 sec.
Drive apron / garage entry:
- Baseline: Wall lights low for address/keypad visibility.
- Lift: A shielded flood or the wall lights boost when they detect approach.
Dock / shoreline:
- Baseline: Low, warm edge markers for wayfinding.
- Lift: Post-mounts boost near slips or lift controls.
We recommend looking for modes labeled “DIM + PIR”, “Low + Boost,” or similar. On SunTino path, wall/step, and dock families, this is the quickest route to a calm scene with light “on demand.”
Solar Reliability: Autonomy, Duty Cycle, and What Controls Do to Runtime
Solar fixtures are small power plants. Your panel harvests, the battery stores, and your controls decide how fast you spend. To keep lights dependable year-round, match control choices to autonomy (how many nights of reserve you carry) and duty cycle (how many minutes per night you’re actually bright). Solar simply clicks when it comes to outdoor lighting, thanks to:
- Autonomy: If a fully charged fixture can survive 1–3 cloudy nights at your chosen settings, that’s solid autonomy. Bigger panels, efficient optics, and sensible controls increase autonomy.
- Duty cycle: The total “on” time at each brightness. Dusk-to-dawn at 100% is a heavy duty cycle; 20% baseline + a few short boosts is light.
How Controls Change Your Night
Each control mode spends your battery differently—and changes how the space feels—so pick the pattern that matches your routine, not just the brightest option:
- Photocell, full-night high: Predictable light, shorter runtime on low-sun days; great for critical markers if your sun exposure is strong.
- DIM + PIR: Best battery ROI—long nights are no problem, because you spend brightness only when someone’s there.
- Curfew (timer/astronomic): Splits the night; you protect morning hours by turning off or going to motion-only after midnight.
- Smart tweaks: Nudging baseline from 20% → 30% can halve effective runtime on marginal winter days. Tiny changes can make a big difference.
Seasonal Realities, and How to Plan for Them
Sun angle, day length, and even pollen shift your available charge; tune settings and upkeep to the season so performance stays steady year-round:
- Winter’s lower sun= less charging. Lean on DIM + PIR and curfews.
- Summer’s long days support longer baselines and more decorative effects.
- Dirty panels are lost power. Wipe monthly in pollen and dust seasons. Near water, rinse salt spray. A clean panel is free runtime.
Start conservative—low baseline, short boosts—then observe a week of nights. If the lights always last till dawn, step the baseline up a notch. If they sag before morning, cut boost time or shift to motion-only after midnight.
Privacy & Security: Light What You Need Without Blinding Cameras or Neighbors
Security lighting is not “bright everywhere.” It’s clear where you are and dark where you aren’t. Over-lighting creates two problems: camera washout and neighbor glare. Both are easy to avoid with aim and optics.
Keep Your Doorbell and Drive Cameras Useful
The goal is clean footage—faces readable and plates legible—without turning the lens into a white flare; a few placement and setting tweaks get you there:
- Offset the beam: Don’t aim a fixture straight at the lens; aim across the approach so light lands on faces from the side.
- Lower beats higher: A lower, shielded wall light that washes the stoop keeps faces clear without flaring the camera.
- Warm tones help: 2700–3000K reduces harsh contrast compared to cooler light, which cameras tend to overexpose.
- Tame the boost: A 15–20 sec motion lift is usually enough to capture the event without blasting long after the person leaves.
Be a Good Neighbor by Design
Keep light on your surfaces and stop it at the property line; small choices here prevent trespass, skyglow, and late-night window glare:
- Use cutoff optics: If you can see the LED from the property line, it’s probably glare. Choose fixtures where the source is hidden.
- Aim below horizontal: Nothing should send light above the horizon; skyglow and window hits live there.
- Test from the sidewalk: Take a two-minute night walk; if a light reads as a bright dot from common views, tweak aim or add a visor.
SunTino’s wall lighting, path lighting, and waterfront lighting fixture families emphasize downlight and shielded beams. Pair that with warm CCT and you’ll look secure without looking harsh.
Integration Reality: What’s Plug-and-Play vs. Pro-Level Systems
Many properties thrive with fixture-level controls and never need a central brain. If you do want deeper integration—keypads, whole-home scenes, or linking landscape lights to driveway gates—that’s home-automation territory.
What’s Typically Plug-and-Play
These are the built-in, out-of-the-box controls you can set at the fixture or with a simple app—no central hub, custom programming, or automation dealer required.
- Photocell, PIR, and selectable timer modes built into the fixture.
- Astronomic schedules available on some controllers or smart add-ons (when supported and outdoor-rated).
- Local grouping (a few adjacent fixtures responding together) via app or paired sensors, where the product supports it.
When to Loop in a Pro
If you want your landscape lights to talk to the rest of the house—or to follow complex, multi-system triggers—that’s the point where a licensed home-automation integrator should take over.
- Whole-home control (Control4/Lutron/Crestron) where one interface steers many systems.
- Complex triggers (gate opens → path lights lift → cameras record).
- Mixed power types (line-voltage architectural lights + low-voltage + solar across one logic).
SunTino’s solar outdoor lighting fixtures are made to withstand rough weather and easy field control. System design and programming—Control4, Lutron, Crestron—are handled by licensed integrators. If you want that level of tie-in, we recommend consulting a qualified pro; your electrician or local AV dealer can advise on compatibility.
How to Match Controls to Real-World Use, No Programming Required
A little structure goes a long way. Start with how you actually move through the property, then assign the simplest control that fits.
Entries and Front Walk
Before any list, remember the goal: Visible steps and locks, friendly approach, no camera flare.
- Baseline: Photocell at low all evening for address and lock.
- Lift: PIR boost on approach (15–30 sec).
- Curfew: After midnight, motion-only to protect battery and keep the street calm.
Side Gates, Trash Runs, and Sheds
Purpose is utility on demand; nobody lingers here.
- Baseline: Off.
- Lift: PIR motion-only to bright for 30–60 sec.
- Pro tip: Aim sensor across the path; mount lower to avoid street triggers.
Patios and Grill Zones
Aim for social comfort without glare.
- Baseline: Photocell low through evening hours.
- Curfew: Timer or astronomic off by midnight.
- Optional: Boost on motion near steps.
Drive Apron and Garage
You want wayfinding and a clean camera view.
- Baseline: Wall lights low for address and keypad.
- Lift: PIR boost from a shielded flood angled across the apron, not into the lane.
Waterfront, Docks, and Lifts
When it comes to the waterfront, safety always comes first. With the right waterfront lighting strategy, you can create the picture-perfect setting:
- Baseline: Warm, low edge and post markers (photocell).
- Lift: Motion at slips and lift controls.
- Rule: Keep beams down, away from the water surface.
Some Simple Tests That Save You Time Later
Good control choices become great ones with tiny bits of testing. Do these before you lock anything in.
- Dusk simulation: Cover the panel with cardboard to trigger “night,” then walk past the fixture. Adjust boost time until it feels natural.
- Neighbor check: Step to the property line and look back. If you see a bright dot, add a visor or tweak aim.
- Camera preview: Open your doorbell/drive app, trigger motion, and watch the clip. If faces blow out, soften the angle or lower brightness a notch.
- Winter rehearsal: If you’re buying in summer, set a stricter curfew (off at 11) and shorter boosts to simulate shorter charge days.
- Panel hygiene: Wipe with a soft cloth and mild soap; hard-water film can trick sensors and cut charge by more than you’d think.
Walk the Yard, Then Pick the Control
Comfort at night comes from lights that behave the way you live. Use photocells for the quiet baseline that makes spaces feel ready; add PIR motion where footsteps happen; lean on timers or an astronomic schedule to keep late hours calm; and use app tweaks only where they simplify life. Layer a low glow with a short lift on approach to avoid the runway effect. Aim beams onto surfaces, not into eyes. Let cameras see faces, not flares. And if you outgrow fixture-level control, that’s when a home-automation pro earns their keep.
When you’re ready to turn choices into hardware, browse SunTino’s solar outdoor lighting lineup by job—paths and gardens, walls and steps, adjustable spots and floods, docks and posts—and pick the models that fit the way you just mapped your nights. Walk the yard, then pick the light—find the fit at SunTino.